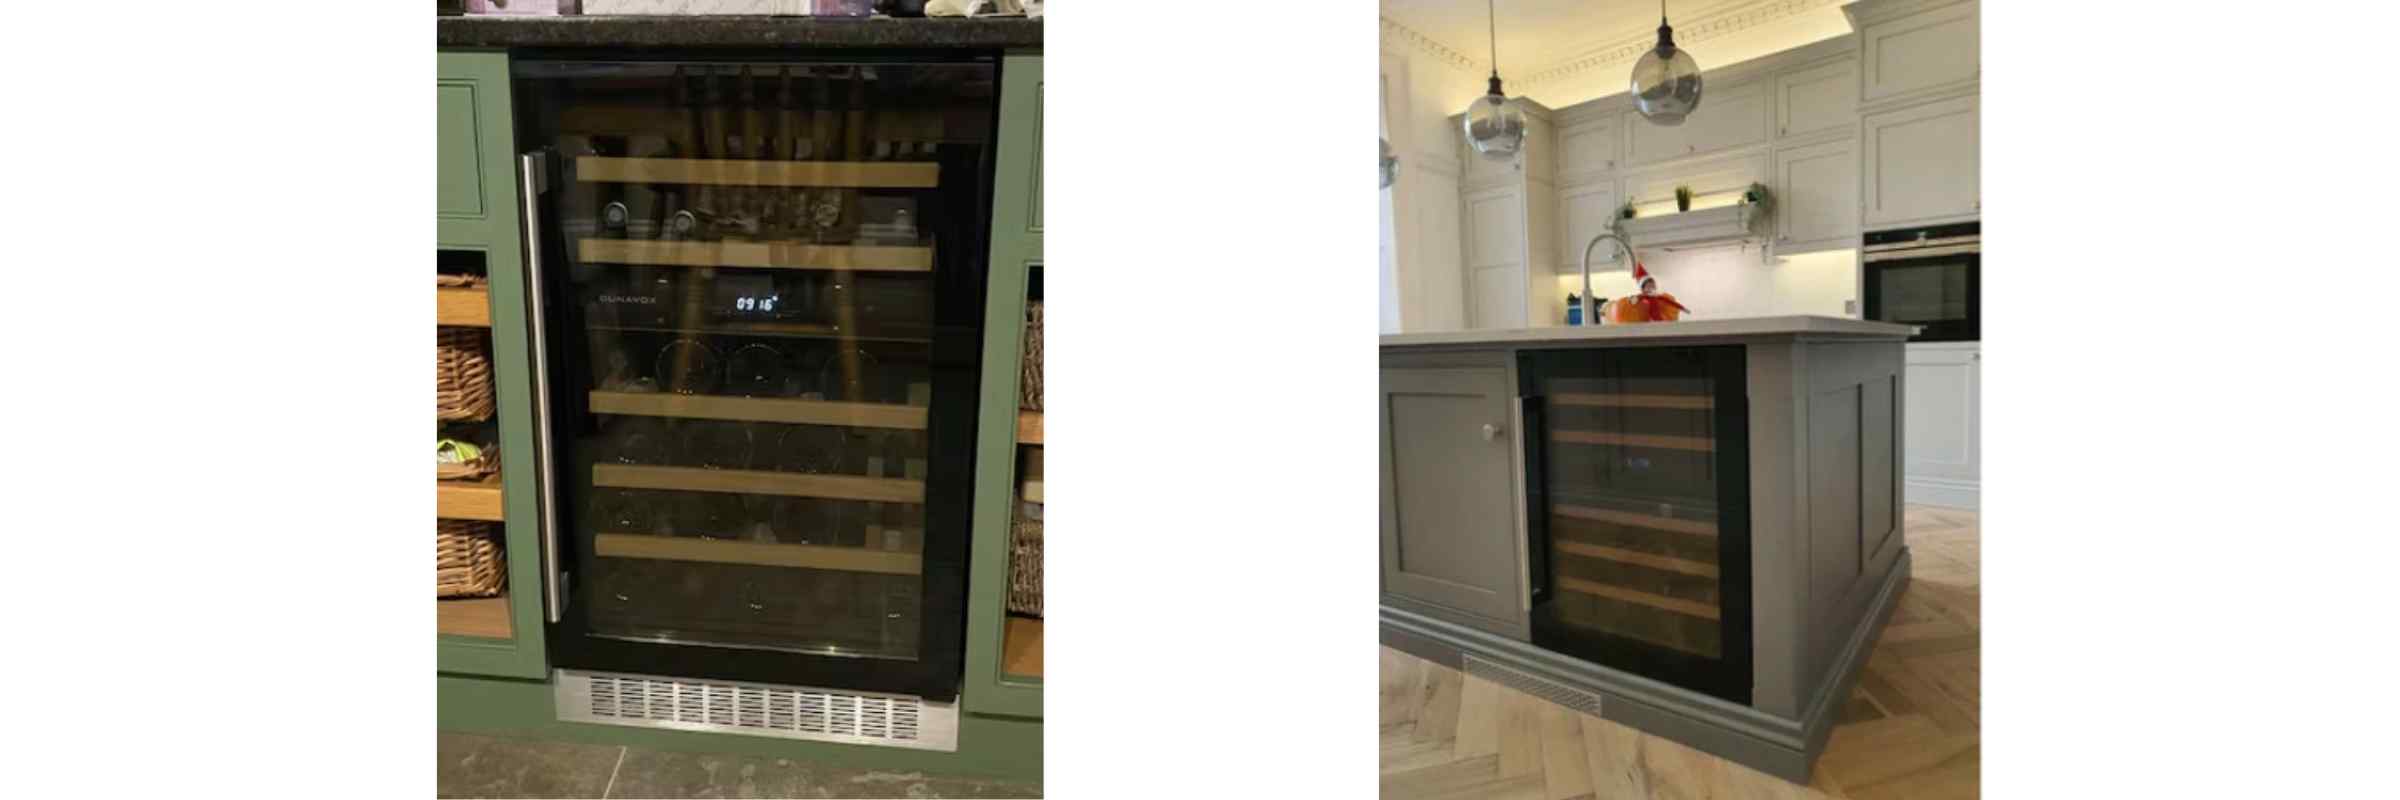
Wine fridges are designed to sit on the floor, surrounded by cabinetry on all sides except for the door, which remains exposed.
They have fans on the underside and a grille at the front, which allows for cool air to be drawn inside the cooler itself.
Installing a Wine Fridge
Depending on the wine fridge size and dimensions, warm air is either expelled via another fan or through the small gaps on the sides.
Grilles on these types of units should not be blocked by plinths or skirting boards, as this can hinder their effectiveness.
If you wish to run a plinth along the front of the unit, it is important that you install a grille. This will allow the unit to still draw in cool air.
How Do You Install a Wine Fridge?
Preparation Before Purchasing
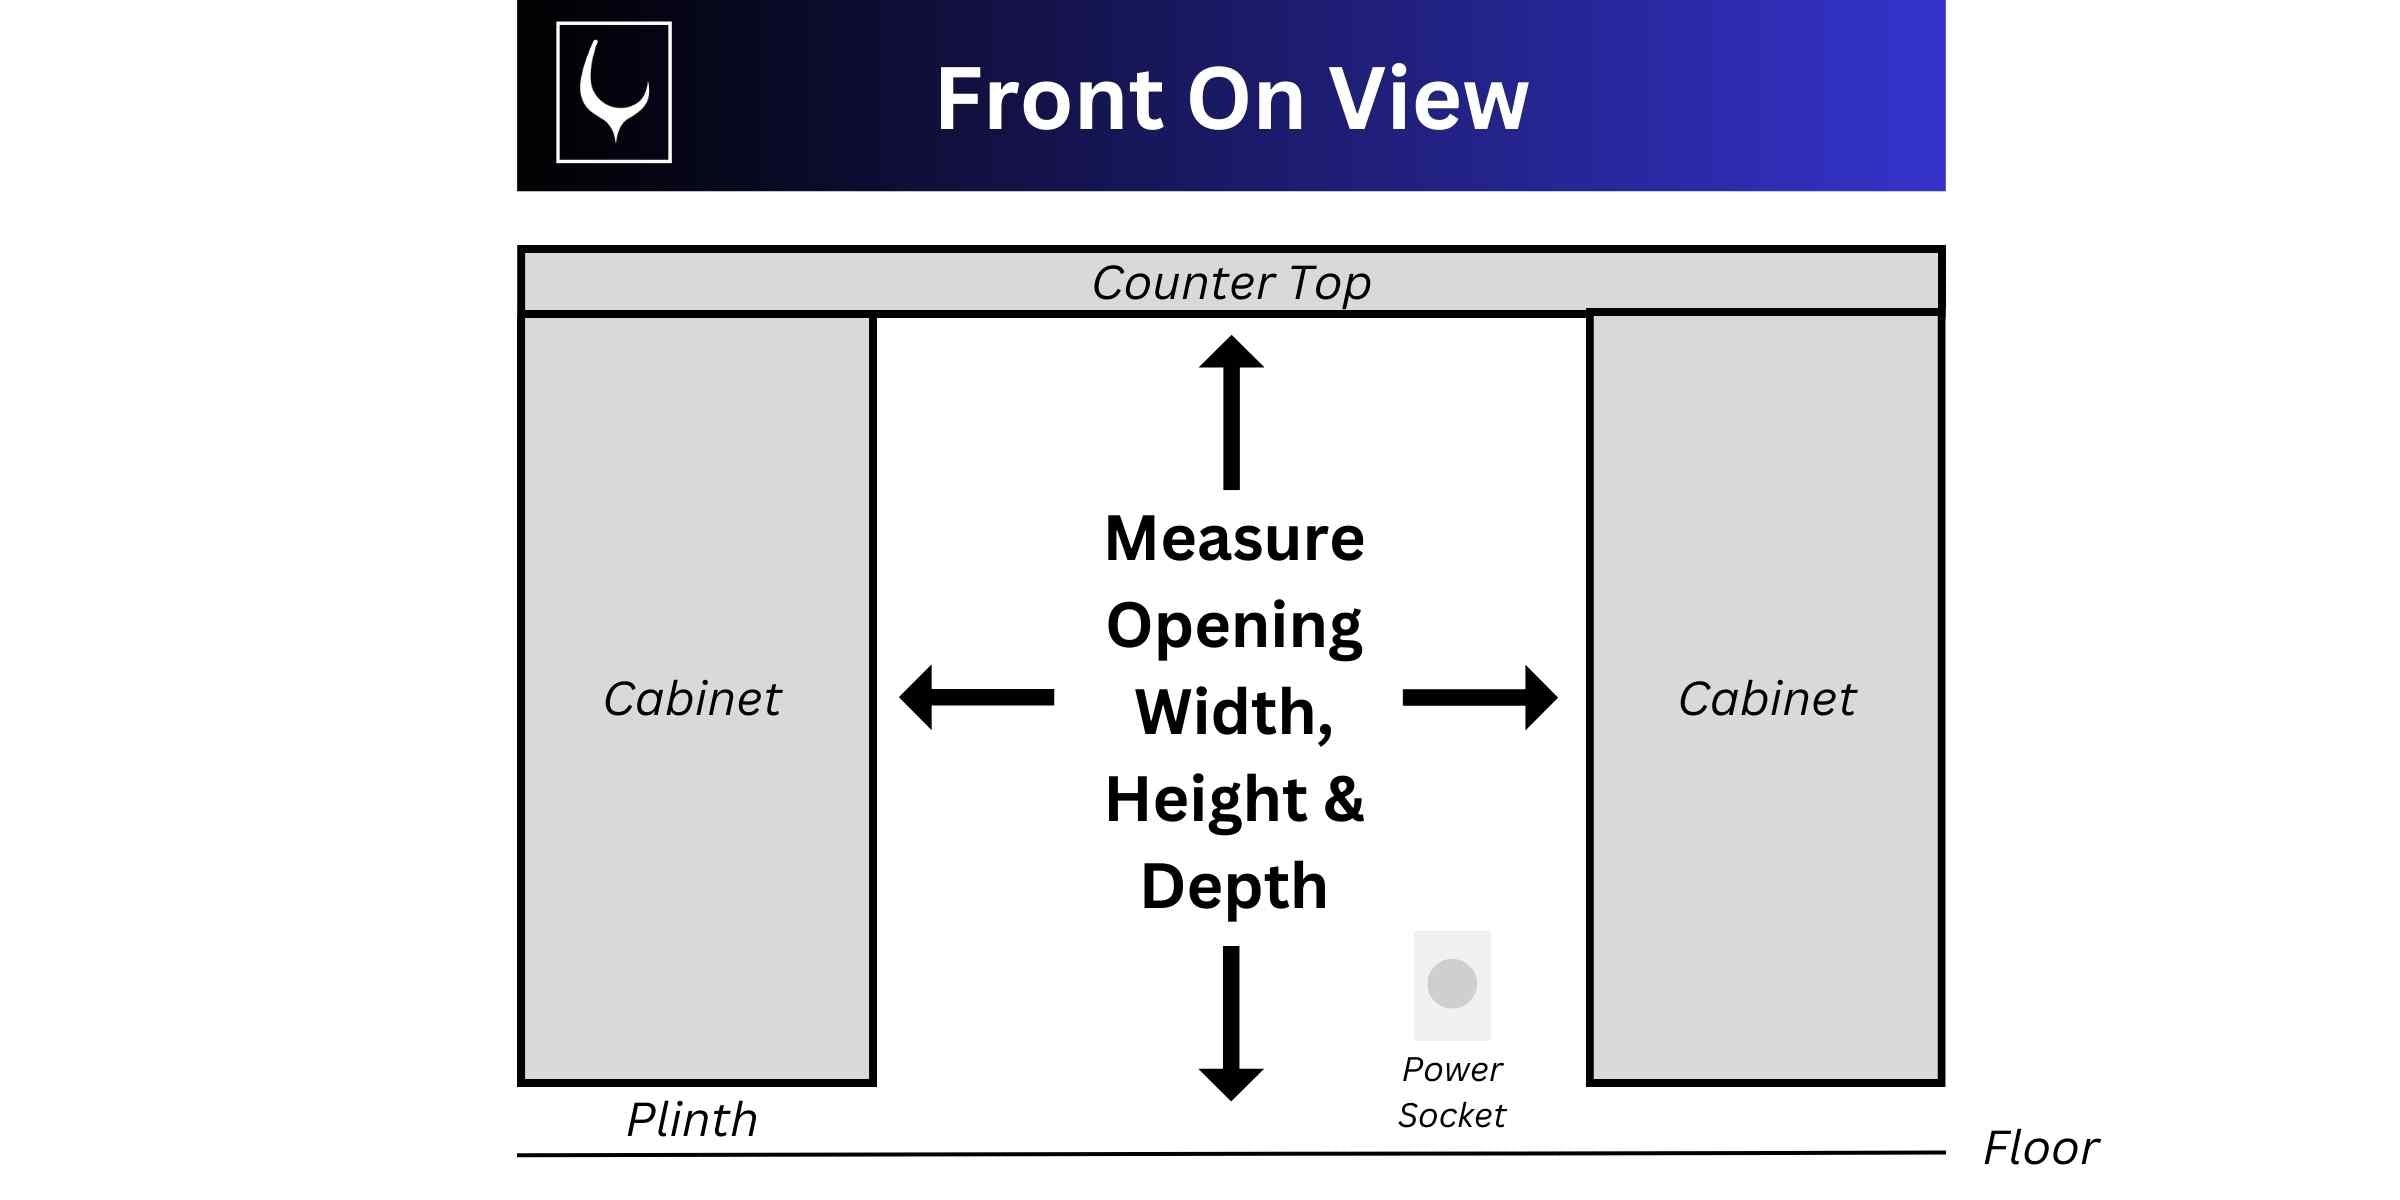
Before making the wine fridge purchase, measure the space or cavity you have available to fit the wine cooler in.
You can find wine fridges for sale here.
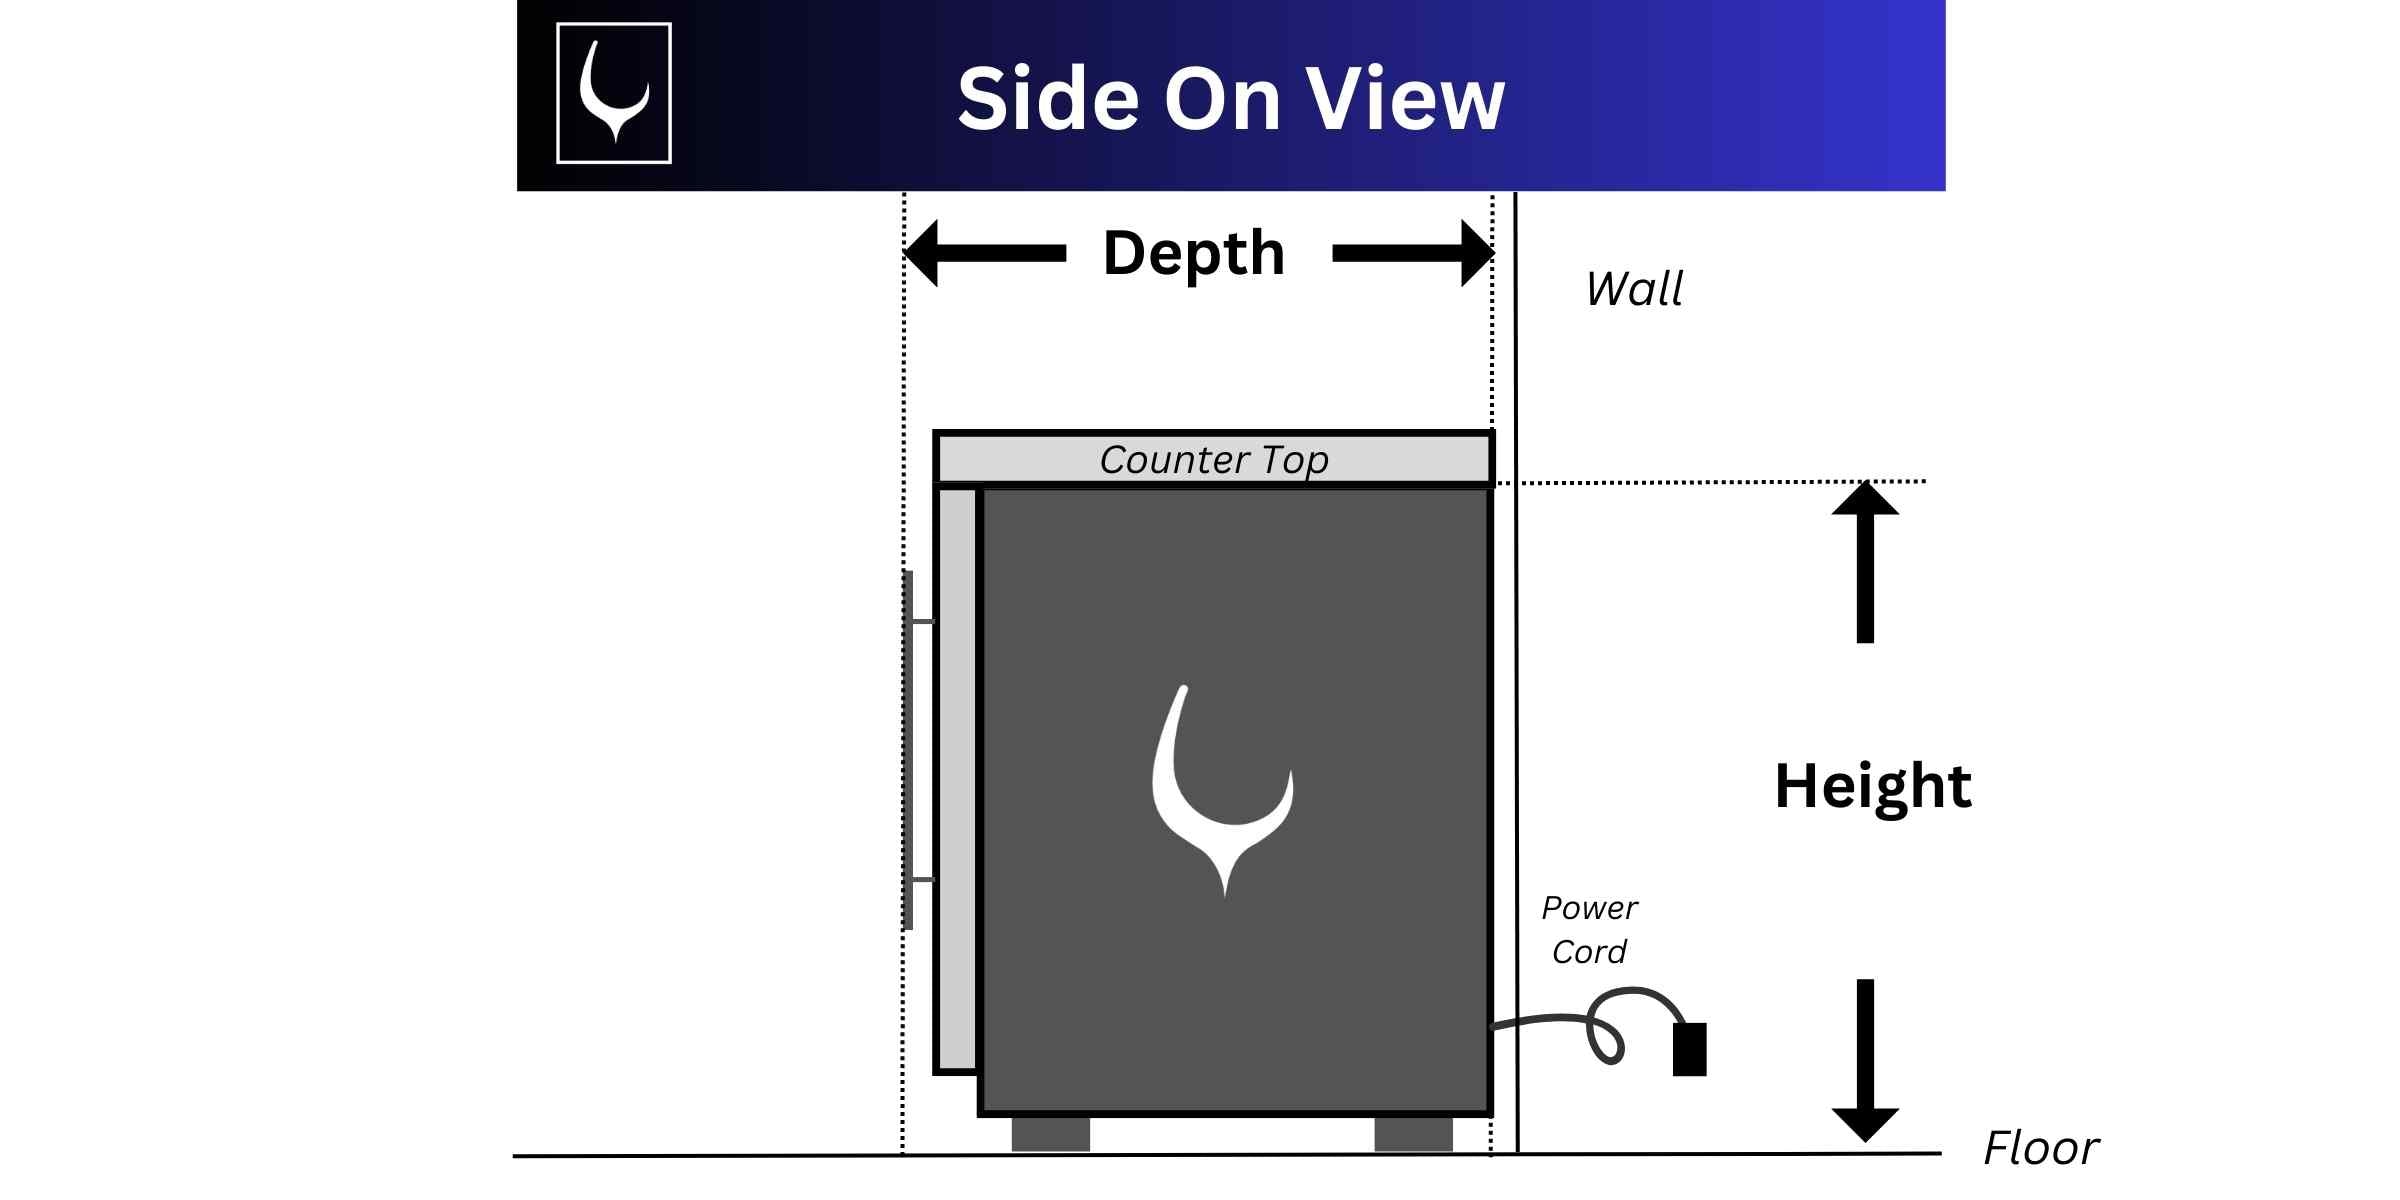
Double check the dimensions of the built in appliance and ensure there is sufficient room for the height, width and depth of the unit.
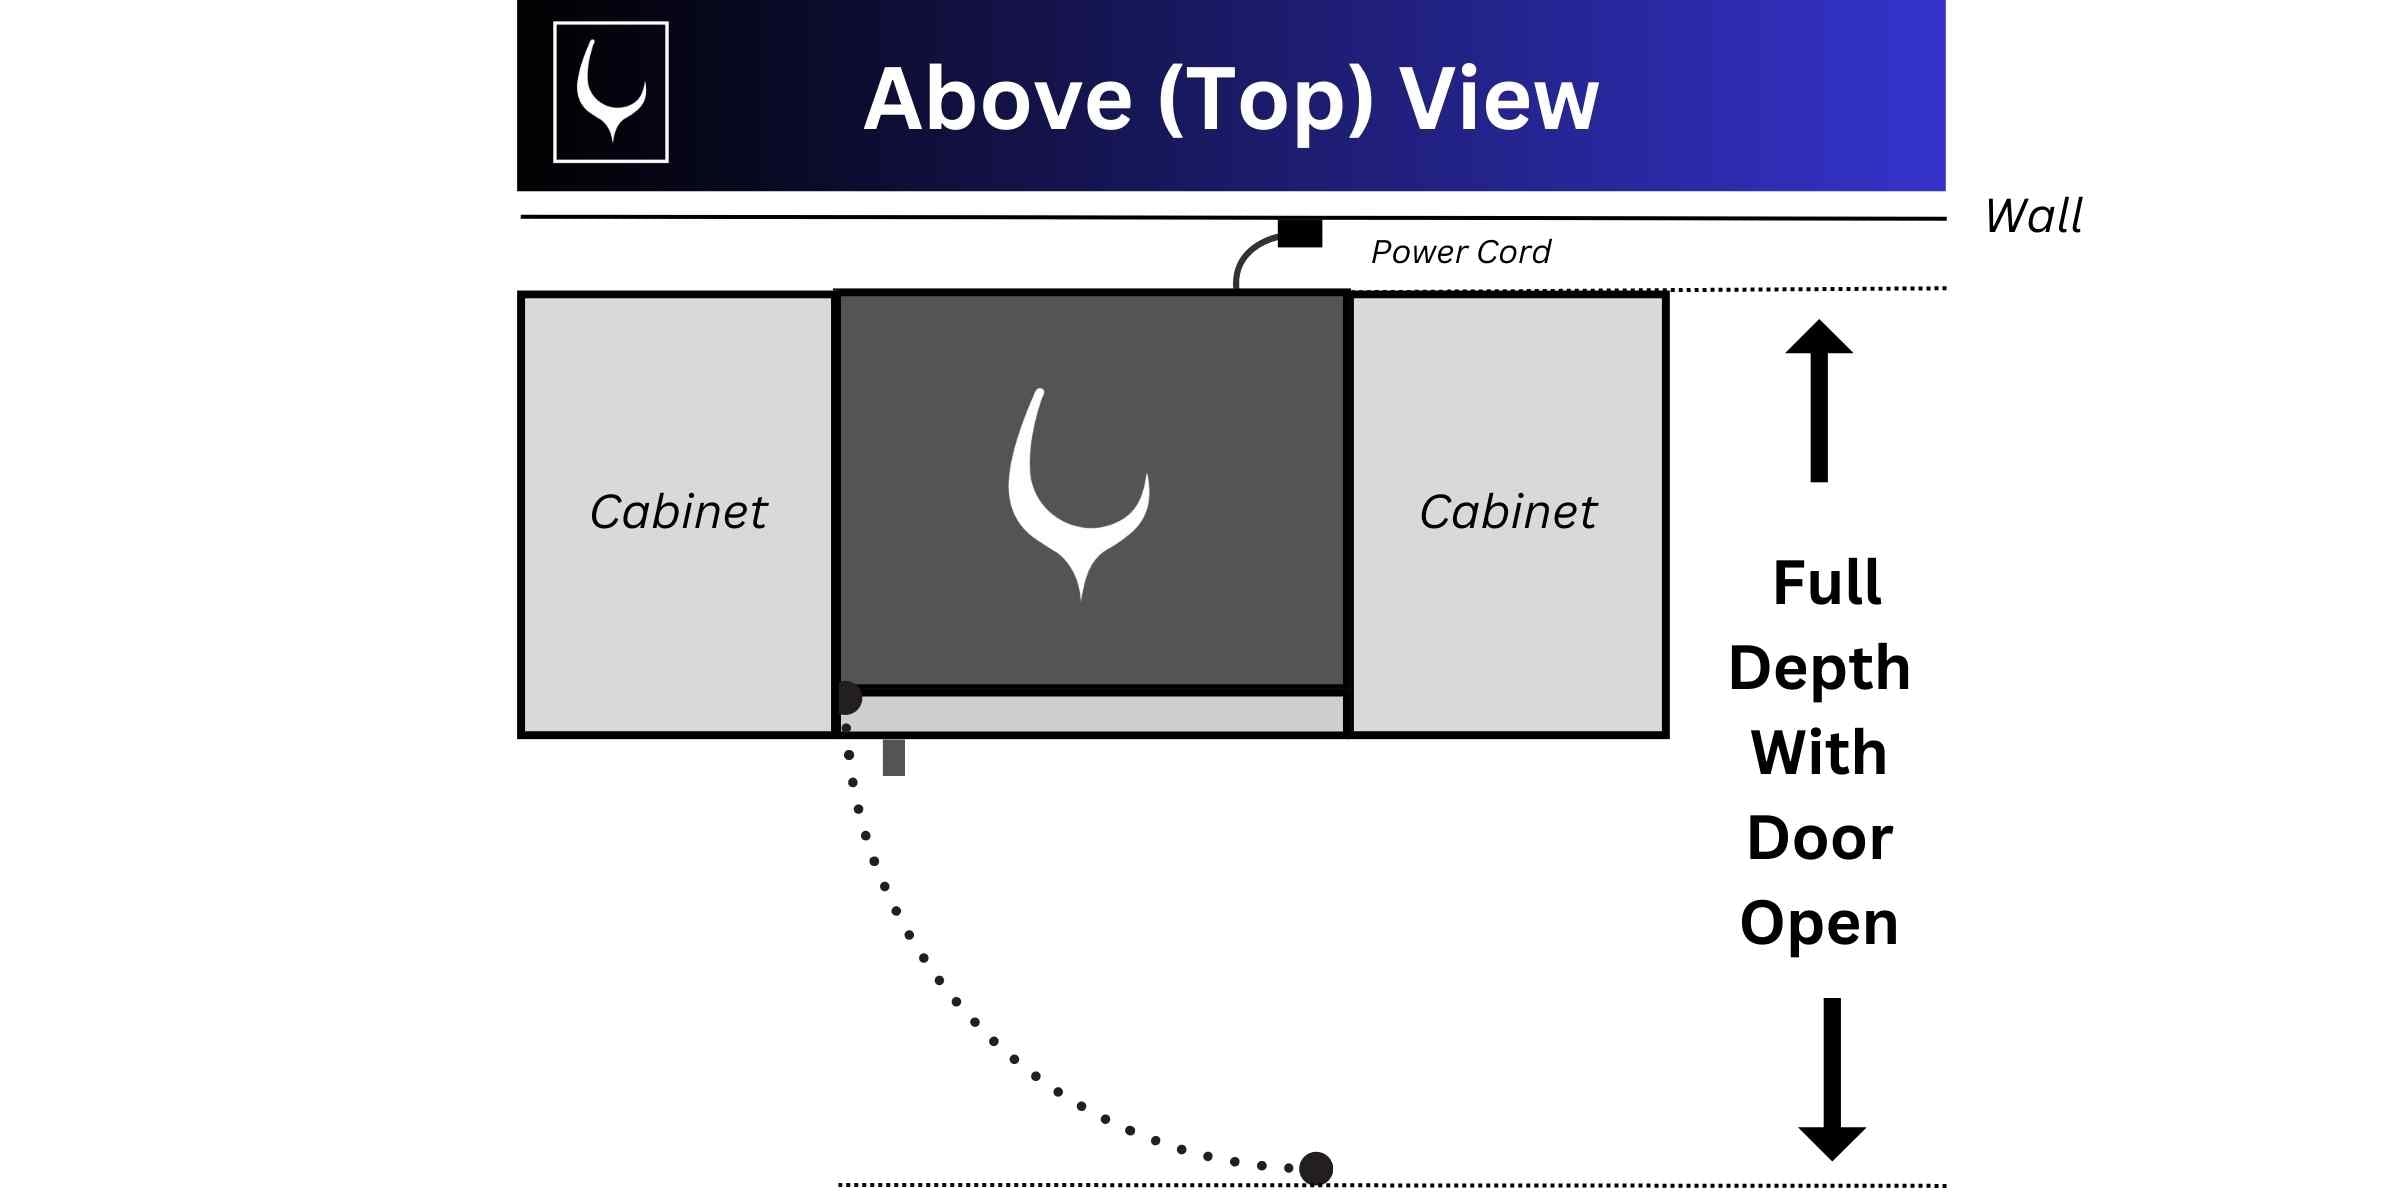
You also need to allow for any space required for the door to swing open.
Along with this, account for space at the rear of the unit for the power cord / ventilation if its needed, especially if you're installing a wine wall.
Useful points to check are (which should be available in the product specification):
- Depth of the wine fridge including the handle
- Free space needed around the sides of the unit (not always needed)
- Space needed at the rear of the wine cooler
- Check which side the door hinge is and account for any room needed to allow the door to swing open
Front View Built In Wine Fridge Installation Diagram
Side On Diagram of Wine Fridge Install
Top View Diagram of Wine Fridge Install (including Door Swing)
What Tools You Need To Install The Wine Fridge
If you have opted for a built in wine cooler, you will need to know how to properly install it. You will need:
- Spirit Level
- Scrap Wood
- Tape Measure
- Manual for the Wine Cooler
- Phillips Head Screwdriver
If the wine cooler has adjustable feet, you will not need scrap wood.

Follow these 5 steps to get your built in wine cooler up and running correctly:
Step 1: Make Sure You Have Access to Power
- Firstly, ensure that your wine cooler will be accessible to a power source. If possible, you should avoid using an extension cord, as this could make your warranty invalid.
- If you need to move the unit to the perfect space, make sure to lift it with caution. Don't try to lift the cooler by yourself and be careful not to scratch the floor.
Step 2: Measure The Space & Position The Appliance
- It’s important to make sure your measurements are accurate. Carefully measure the area where the wine cooler will be placed using a tape measure, checking that your measurements are correct.
- You should be able to fully open the wine cooler doors and the wine should be able to be ventilated. Remember, in addition to the front vents, built in wine coolers have side vents that need to be opened so that they don't overheat.
- Position your wine cooler carefully in the space you have available and wait until it is plugged in before turning it on.
Step 3: Mount And Level The Wine Cooler
- Check that your wine cooler is securely mounted to the cabinet with mounting plates. To do this, you will need a Phillips head screwdriver.
- The cooler must be levelled and this is where the scrap wood comes in. Having level shelves and storage inside your cooler will stop bottles from rolling around inside.
- If the wine cooler has adjustable feet, you can use these to level the unit. Typically, these can be adjusted by hand, but consult the manual to make sure you're doing it right. If there are no adjustable feet, use scrap wood to level everything.
Step 4: Leave The Wine Fridge Gasses To Settle
- The coolant in the unit must settle once it has been moved in before it can be used, so leave it to rest for 12 - 24 hours for the gases to settle before turning it on.
Step 5: Turn On The Fridge (And Enjoy!)
- Once you've turned on the wine fridge, fill the unit up to over 75% capacity as this allows the wine fridge to work most efficiently and effectively.
- Depending on the size of the unit, the temperature of the room and the temperature of the bottles being added in to the wine fridge it can take up to 3 - 5 days for the wine cooler to get to the temperature you've set it too.
What Sizes Do Built In Wine Fridges Come In?

When a built in wine cooler is narrower - such as those that measure 15cm, 30cm, or 40cm - there should always be a minimum of 0.25cm of breathing space around the sides.
This is to allow the warm air to escape, as now allowing this air to escape space will hinder the unit’s cooling performance.
The doors of thin wine fridges - such as those below 600mm - should not be fully integrated. This means that a kitchen cabinet door should not be placed in front of the cooler door, as the ventilation to the sides and above the unit could be obstructed.
Due to the fact that the single fan is located on the underside of the thinner built-in units, blocking the sides will block the necessary airflow.
Do I Need to Leave Any Ventilation to The Rear of My Wine Cooler?
Likewise, built in and front venting models should have at least 0.5 - 1 cm of breathing space at the back.
This is in order to allow the necessary air flow, but also to ensure that it is not in direct contact with the back wall or cupboard, which can cause unwanted vibrations.
Can a Freestanding Model Be Built In?

No, a freestanding model cannot be put inside a built in unit. Freestanding wine coolers are designed with a vent on the back of the cooler to allow them to stand alone.
If the wine cooler is positioned directly against a wall or cabinet, it will obstruct the vent and prevent the heat from dissipating. If this continues, the heat will build up and overheat, changing the temperature within the cooler and preventing it from functioning correctly.
If a wine cooler's vent is blocked, the cooler will have to work twice as hard to cool down, resulting in an increase in energy consumption and the cooler overworking. To perform at its best, your wine cooler must be put in the proper environment.
This isn’t a problem with built in wine coolers, as they feature ventilation on the front. This means the heat will disperse through the front and won't be stopped by anything when they are installed.
Can I Put a Wine Fridge In an Existing Cabinet?
Yes, wine coolers can be installed in existing cabinets. However, this is only the case with built in wine coolers. Freestanding wine coolers are not ideal for installation within a cabinet or a small space, as the airflow would be restricted.
Wine fridges are very common, but if you live in a smaller location, such as an apartment, you may not always have the space. This is where freestanding wine coolers come in handy.
Freestanding wine coolers are fantastic and can really complete the interior design of a kitchen, but if you don't have the room, a built in wine cooler is the best option.
Maximise your storage space by purchasing a specially designed tall wine fridge which are suitable for building in to cabinetry - explore floor to ceiling wine fridges.
You can relax knowing that selecting a built in option does not mean you will experience a lesser quality product, as they are both equally good.
Can You Put a Wine Cooler On The Carpet?
Once you have purchased a wine cooler, you need to figure out where you will put it. A wine cooler is ideally stored in a kitchen or a utility area, but it’s not uncommon to find one in a basement or office.
When deciding where to put your new wine cooler, take into account not just the amount of space available, but also the type of surface you will be using.
Freestanding wine coolers should not be placed on carpet because mildew can grow if the wine cooler leaks or something is spilled.
Though this is not a major problem to be concerned about, it's better to avoid it altogether by making sure your wine cooler is put on a flat surface where it will be solid and level.

Considerations When Installing a Wine Cooler
Choosing a wine cooler is a fun and enjoyable task, but figuring out how to install it can be a little bit more stressful. Follow our simple instructions below, which include helpful hints on what to look for when installing an under counter model.
Buy an under counter wine cooler today.
Ventilation
It's critical to ensure that your wine cooler has the right amount of ventilation in order for it to function properly.
Fortunately, most under counter units come with front ventilation, making installation a breeze. However, if you purchase a freestanding wine cooler then the vent will be situated in the back.
This will require you to leave enough distance between the vent and another surface, such as a wall. It’s important to make sure that nothing is preventing the ventilation system when you put your wine cooler in the designated space.
A useful suggestion is to make sure you have considered all of your possibilities for where you will put your cooler, and then choose the best option.
Measurements
When it comes to installing a kitchen appliance, measurements are crucial and the same is true with wine coolers. You must carefully consider the space you have and where you can house your wine cooler before installing.
If you have a small space, a slimline wine cooler may be the best option. Alternatively, if you have available cabinet space, an integrated wine cooler would be a great addition to fill that unused space, you can purchase an integrated wine fridge here.
It's not only about the measurements, you also need to evaluate whether you have enough room to open the doors completely.
This is something that many people overlook when purchasing and installing a wine cooler, and it is one of the most common difficulties that users face.
If you can't fully open the door, it can be inconvenient to use because you won't be able to access specific parts of the cabinet. This limits your ability to use the cooler to its full capacity.
If a wine cooler is installed too close to other surfaces, the door may not be able to fully open. Some wine coolers have doors that are the precise width of the cabinet, while others require extra space.
Power
You need to think about how you will power the wine cooler. If you have direct access to an electrical power source, you should be able to power the cooler.
Location
The location of your wine cooler is paramount to ensuring that it functions at its optimum. As previously said, ventilation is required, so the area must be well ventilated.
Avoid placing your wine cooler in direct sunlight or in a location where the sun shines brightly, since this could damage the wine. As UV rays can alter the flavour and quality of your wine, some wine coolers include UV protective glass to help prevent sun damage.
It's also important to remember that if the sun is shining directly on your cooler, it will have to work more in order to keep it cool. This could mean it will become less efficient over time.
It's also a good idea to consider the type of flooring you will be using for your cooler, as it is not recommended to place a wine cooler on a carpeted area.
Instead, find an even surface where it will remain stable.
You could also consider an integrated wine fridge if you want the cabinet to run flush against the side of the fridge.
More Information
Related
- What Size Bottle Will Fit In My Wine Fridge?
- How Noisy Is A Wine Cooler?
- Why Is My Wine Fridge Beeping?
- Why Is Your Wine Fridge (or Compressor) Not Turning On?
Summary On Wine Fridge Installation
It's important to buy the right wine cooler for the install location you have available, make sure you purchase a built in wine fridge if you're fitting the appliance into existing cabinets.
If you have any questions, leave them in the comments, or email us at info@expertwinestorage.co.uk
You can browse more posts on Wine Storage here.


 Author:
Leave a comment (all fields required)